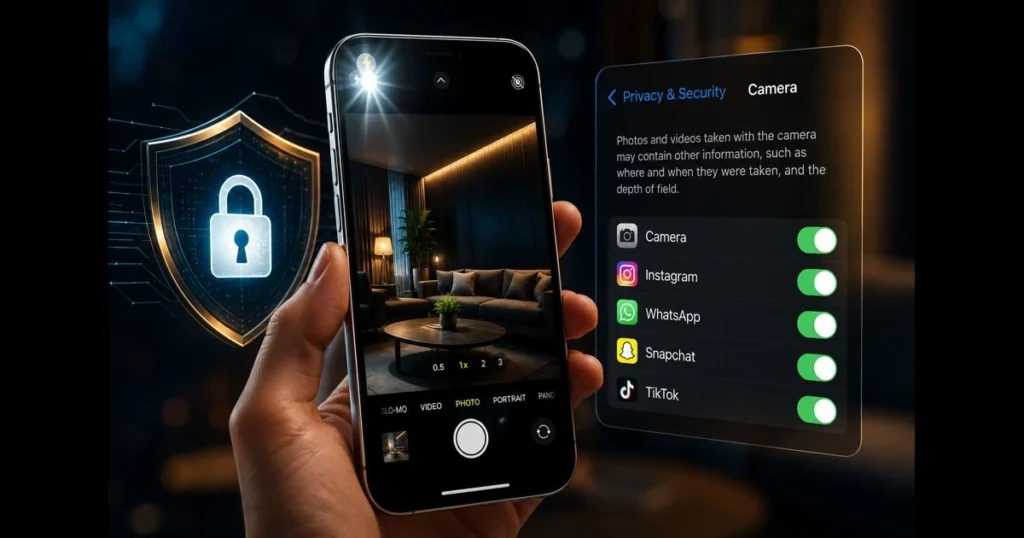
Have you ever opened your Camera app in a dim restaurant or tried to record a quick video at dusk? The flash is crucial for capturing clear images. This guide explains how iPhone camera permissions work, how to enable flash in Apple’s Camera and third-party apps, and what to do if your flash misbehaves. You’ll also find practical photography tips for using light effectively, along with privacy pointers to control how apps use your camera. Whether you’re troubleshooting a “flash not working” issue or seeking smarter control, you’re in the right place. Related reading: iphone flash not working.
- Understanding iPhone Camera Permissions
- How to Check Camera Permissions on Your iPhone
- Enabling Flash Access for Camera Apps
- Troubleshooting Flash Access Issues
- Managing Flash Settings for Third-Party Apps
- Best Practices for Using Flash on iPhone
- Privacy Considerations with Camera and Flash Access
- Conclusion
1. Understanding iPhone Camera Permissions
Overview of camera permissions on iPhone
On iPhone, camera access is managed through app permissions. The first time an app tries to use the camera, iOS prompts you to allow or deny access. If you tap Don’t Allow, the app cannot use the camera or the built-in LED flash. Flash control is bundled with overall camera access, meaning if an app can’t open your camera, it can’t activate the flash. (See: Adobe Flash.)
Think of it this way: flash rides along with camera. If an app lacks camera access, it can’t utilize the LED as a flash, though it may still function as a general flashlight or for system features like LED Flash for Alerts.
Importance of granting access for optimal functionality
Granting camera access ensures you can take photos, scan documents, record video, and use in-app flash controls seamlessly. Denying access can cause errors, black viewfinders, or disabled icons. Aim for balance: grant access to apps that genuinely need it and periodically review permissions to maintain both privacy and photography quality. Related reading: iphone flash notifications.
2. How to Check Camera Permissions on Your iPhone
Step-by-step guide to accessing Settings
Verifying camera access on your iPhone takes less than a minute:
- Open Settings.
- Tap Privacy & Security.
- Tap Camera. You’ll see a list of apps with toggles.
- Turn on the toggle for any trusted app you use for photography, scanning, or video calls. Disable it for apps that don’t need access.
You can also adjust permissions per app: go to Settings > [App Name] > enable Camera. This is useful if you can’t find the app in the global list or are troubleshooting a specific tool.
Identifying apps that require camera access
Common candidates include social networks, messaging tools, video calling apps, document scanners, and creative camera apps. If an app captures photos or video—or needs the LED flash—it requires camera permission. Apps that only browse your gallery don’t need camera access; they require Photos library permission instead.
3. Enabling Flash Access for Camera Apps
Instructions for enabling flash in the Camera app
Once an app has permission, you still choose when to use the flash. In Apple’s Camera app:
- Open Camera.
- In Photo mode, tap the lightning bolt. If it’s not visible, tap the ^ (caret) at the top of the screen to reveal controls, then tap the bolt.
- Select Auto, On, or Off.
- For Video, Portrait, or other modes, the flash/torch option appears similarly. In Video mode, “flash” becomes a continuous light (torch).
Two nuances matter. First, Night mode and flash often trade places—choosing flash may disable Night mode. Second, if the flashlight is on from Control Center, the Camera app can’t use the flash; switch it off before shooting.
Tips for using flash effectively in various lighting conditions
Flash works best as fill, not a spotlight. For faces in dim rooms, set the flash to On and lower exposure slightly by dragging down on the viewfinder after tapping to focus.
When shooting a product on a table, angle the phone slightly to avoid harsh glare, and diffuse the LED with a thin tissue if needed. Outdoors at dusk, use flash to illuminate shadows while preserving ambient tones. These small adjustments can enhance your shots significantly.
4. Troubleshooting Flash Access Issues
Common reasons for flash access problems
If you encounter “flash not working” moments, start with these checks:
- Permissions off: The app lacks camera access, preventing flash use.
- Flash set to Off: The icon may be disabled or set to Off within the Camera app or a third-party tool.
- Flashlight already on: The Control Center flashlight blocks the camera flash.
- Thermal or battery limits: High temperatures or low battery can temporarily disable the flash to protect hardware.
- Focus/mode conflicts: Night mode or specific capture modes can override flash until manually selected.
- Obstructions: A case, finger, or grime may cover the LED. This happens more often than you’d think.
One more note: the iPhone’s flash notifications (the Accessibility feature that blinks the LED for alerts) are separate from the camera flash. If the LED is blinking for alerts while you try to shoot, wait a moment or toggle alerts off temporarily.
How to resolve permission errors
Follow this quick checklist for flash troubleshooting:
- Confirm permissions in Settings > Privacy & Security > Camera. Toggle the app off and back on.
- Force-quit the app and reopen it. Then recheck the in-app flash icon.
- Turn off the flashlight in Control Center. Try again.
- Allow the phone to cool if you see a temperature warning. The flash should re-enable automatically after a few minutes.
- Restart your iPhone to reset hardware controllers if the LED seems unresponsive across apps.
- Test the Camera app. If the native app’s flash works but a third-party app’s doesn’t, the issue lies within that app.
Still stuck? Clean the LED cover and lens with a microfiber cloth, remove thick cases, and ensure Low Power Mode isn’t limiting performance in certain apps.
5. Managing Flash Settings for Third-Party Apps
Understanding app-specific flash settings
Many camera and social apps feature their own flash toggle, often marked with the bolt icon but placed in custom toolbars. Some offer options like “fill” vs. “torch,” a separate front-facing screen flash, or smart auto modes that prioritize ambient light over harsh LED. Remember, “flash settings” in these apps are independent of Apple’s Camera app.
As there’s no distinct flash permission, your goal is twofold: ensure the app has camera permission and set the in-app flash control to the desired state. That combination enables flash access effectively.
How to grant or revoke flash permissions for individual apps
To allow flash access for a single app, you must grant camera access:
- Open Settings and scroll to the app in question.
- Tap the app, then enable Camera. Review microphone or Photos access if requested for intended features.
- Open the app and find its flash control. Set it to Auto or On to test.
If you later want to revoke access, go to Settings > [App Name] and turn off Camera. You can also manage all apps centrally via Settings > Privacy & Security > Camera, a clean way to manage app permissions without searching through multiple settings pages.
6. Best Practices for Using Flash on iPhone
Techniques for minimizing glare and shadows
Hard light can be unforgiving, so soften it:
- Diffuse the LED: A single layer of tissue or a small piece of translucent tape can act as a quick diffuser when you lack accessories.
- Change your angle: Move a few inches left or right to avoid direct reflections on glass and glossy objects.
- Feather the light: Tilt slightly to keep the brightest part of the beam away from the most reflective area.
- Use fill, not full: In mixed light, set flash to On and lower your exposure slider a touch for smoother skin tones and controlled highlights.
- Mind the background: Step back to reduce hard wall shadows, or position your subject away from flat surfaces.
These micro-adjustments can often make a significant difference. They’re simple, repeatable photography tips that work in any situation.
When to use flash vs. natural light
Use flash when the subject is close—about arm’s length—for maximum impact. It’s also effective as gentle fill on faces in harsh midday shade. Avoid flash for landscapes, concerts, or distant subjects; it won’t reach them and could overexpose foreground objects. Low, directional window light typically outperforms flash for portraits. If Night mode can hold the scene without motion blur, it often looks more natural than a burst of LED.
7. Privacy Considerations with Camera and Flash Access
Understanding privacy implications of granting permissions
Camera access allows an app to capture live video and stills whenever in use. While iOS sandboxing limits background access, granting camera permission increases trust. Review an app’s purpose: does it truly need camera access, or would Photos access suffice? Be aware that microphone, location, and Photos permissions often accompany camera permission, expanding what an app can collect.
Since there’s no separate switch for flash access, the practical choice is whether to grant camera access at all. If unsure, deny access initially. Most apps let you proceed with limited features until you decide.
How to manage your privacy settings effectively
Establish a monthly permission checkup:
- Open Settings > Privacy & Security > Camera and prune the list. If you haven’t used camera features in weeks, turn off access.
- Review Settings > Privacy & Security > Microphone and Photos; some apps don’t need both.
- Open App Privacy Report (available in recent iOS versions) to see which apps accessed the camera or other sensors recently, then adjust permissions.
- Check Accessibility > Audio/Visual > LED Flash for Alerts if you find notification blinks distracting or want to reduce confusion about flash behavior during photography.
With a few habits, you can maintain tight control without sacrificing convenience.
8. Conclusion
Allowing the right apps to use your camera—and knowing how to control the flash—enhances your low-light photography with fewer surprises. The key is straightforward: confirm iPhone camera permission, learn where the flash toggle is in each app, and apply smart techniques to ensure your lighting looks intentional. If you encounter issues, this guide’s checklist will help you quickly regain flash access and get back to shooting.
Try this: open the Camera app, set the flash to On, take a quick portrait near a window, then repeat with Auto to compare. Next, explore your favorite third-party app, review its settings, and fine-tune. As you grow more comfortable, dive into different camera modes, practice low-light scenes, and keep your permission list tidy to ensure you have the tools you need when it matters.
Finally, remember: if an app says it can’t access the camera, fix the permission first, then adjust “flash settings” second. That’s the quickest way from error message to a well-lit shot.
Frequently Asked Questions
Is “Flash” the same as the iPhone’s camera flash?
No. “Flash” often refers to Adobe Flash, a discontinued web technology that iPhones do not support. This guide is about the iPhone’s camera flash (the LED next to the camera and on-screen flash) used for photos and videos, which is unrelated to Adobe Flash for web content.
How do I let an app use my camera and the LED flash?
There’s no separate permission for the camera’s flash. Grant the app Camera access via Settings > Privacy & Security > Camera (or Settings > [App Name] > Camera). Then open the app and use its flash control (lightning bolt icon) to choose Auto, On, or Off.
How do I turn the flash on or off in Apple’s Camera app?
Open Camera, tap the ^ (caret) at the top if needed to reveal controls, then tap the lightning bolt and select Auto, On, or Off. In Video mode, the flash becomes a continuous torch. Make sure the Control Center flashlight is off; otherwise, the Camera app can’t use the LED.
Why might my camera flash not work?
Confirm the flash isn’t set to Off, the flashlight is turned off in Control Center, and the phone isn’t too hot or in a state that limits hardware. Check for obstructions over the LED, verify the app has Camera permission, and try restarting the iPhone if the LED seems unresponsive.